All Basket weaving
  • Blog
  • Frequently Asked Questions
  • Terms and Techniques
  • Books

Underwater basket weaving

09/24/2014

0 Comments

 
Picture
“Underwater basket weaving” is probably the most maligned imaginary degree out there – a catchphrase for all sorts of classes and degrees that are deemed useless and unmarketable. (As a liberal arts graduate, I have heard of my degree derided a few times as such).

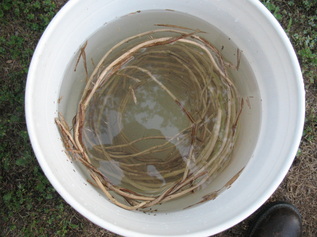
BUT DOES ANY SCHOOL ACTUALLY TEACH UNDERWATER BASKETWEAVING? I would have thought no, but I would be wrong. Underwater basket weaving may have started out as a joke, but several schools now offer classes in the craft. Weaving baskets may be easy to do badly, but constructing a good basket takes skill, patience, the ability to follow directions, the willingness to try something new, and creativity. Oh wait, don’t those sound like skills that a good employee would have?!


Picture
University of California at San Diego offers a recreation class in Underwater Basket weaving. Apparently, the class first started in 1984 and has been going strong since. I found a class that takes place on in May 2013 – it only takes a few hours on the weekend and costs a pittance of $10 (the cheapest class at UCSD). Unfortunately, enrollment is full. Perhaps next year! Students who completed the class get a “diploma” in underwater basket weaving – I’d love one so I can frame it and hang it in our apartment. Reed College also offers an underwater basket weaving class, but I couldn’t find a live registration link.

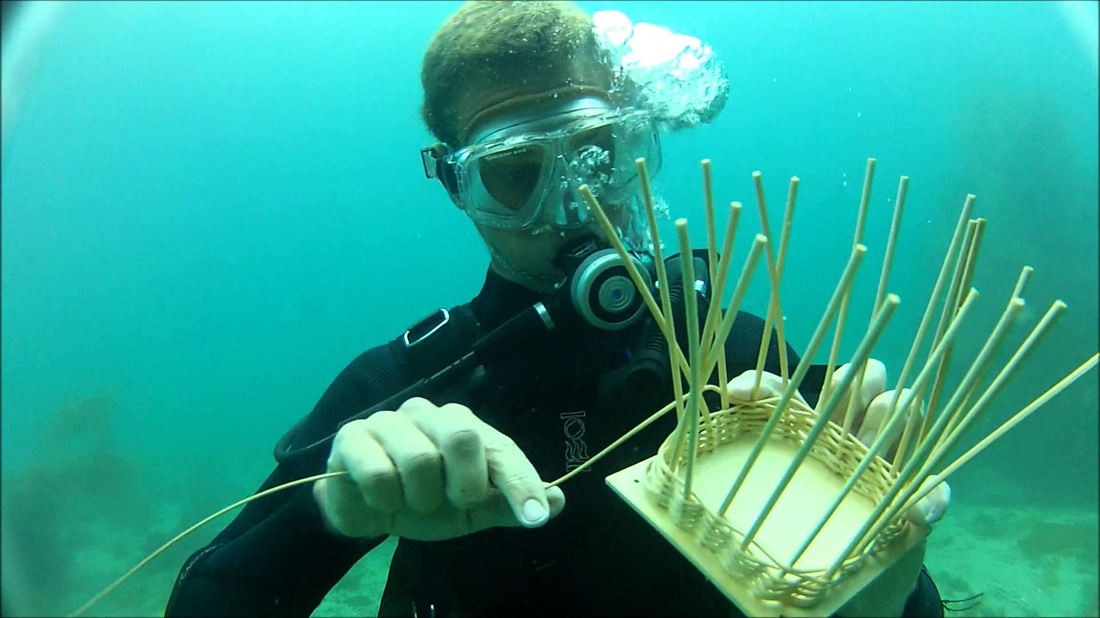
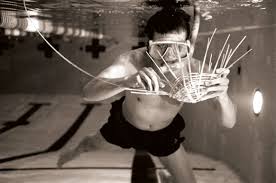
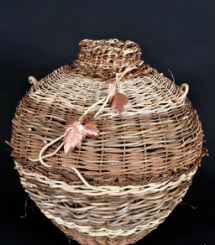
If you are a diver, US Scuba offers you the chance to weave baskets… truly under water. The class description beckons students to “be one of the few divers in the world with this unique Specialty…and take home a memorable souvenir.” (I assume this souvenir is your very own basket).


Add Comment
 

USING corn husk to weave a basket

09/24/2014

0 Comments

 
Picture
Native Americans have been using corn for a myriad of uses for hundreds of years. Corn itself feeds their livestock, and the husks provide a strong material for weaving baskets, moccasins, and backpacks.
The husk of the corn is only at its strongest when properly prepared. After you have selected your weaving pattern, ensure that you prep your DIY setup ideally before moving forward.
•    Read a beginner how-to book or article for basic basket weaving.
•    Find a pattern that fits your weaving ability and envision your completed result.
•    Remove husks off fresh corn. Lay each husk out and towel-dry them, followed by hanging the husks to dry for a few days.
•    When the husks are dry, re-wet them by soaking them in a sink for ten to fifteen minutes
•    Remove the corn husks from the water, and lay flat on a towel. This gets them ready for weaving.
Now that you have properly prepped, you can begin following the instructions inside your selected patterns. Never worry about how many baskets you’ll end up with, as there are many uses for them around the house! Read our previous blog post for DIY tips and ideas for decorating with baskets like The Lazy Susan


Add Comment
 

How to Weave a Basket with Honeysuckle Vines

09/24/2014

0 Comments

 
Picture
There are those folks out there that use honeysuckle almost exclusively for their Basket weaving material.  The Cherokee's still use a lot of native and Japanese honeysuckle in their work in random weave, twining, twill and rib basketry.  Most of what I've used it for over the years tends to be as an additional sculptural element.  The reason why is that the make up of the vine lends itself to being celebrated as a special feature, not just a normal weaver.  


Picture
As a young vine, the honeysuckle vine runners can be very, very long - 20ft or more - and very pliable.  The vine has a fine, paper-like bark on it that is a caramel brown color once it's matured a bit.  When very young, it will be green.  As the vine matures over years, it usually becomes crooked, very woody and has a lot of twists and turns.  Usually you'll find honeysuckle growing in wet, bottom areas like around creeks, marshes or rivers. You can also find honeysuckle growing on barns, buildings or in gardens.  There are lots of different varieties that can be cultivated for home enjoyment within your own basketry garden. 


Picture
"Identification: Japanese Honeysuckle is an evergreen woody vine that may reach 80 feet in length.  The leaves are opposite and elliptically shaped.  The tan vine may reach a thickness of 2 inches in diameter.  Fragrant, white or pale yellow tubular flowers appear in April to August.  Spherical, black glossy berries containing 2 to 3 seeds mature from June to March.

Ecology: Japanese Honeysuckle is a common invasive plant in the Southeast.  The shade tolerant vine occurs along field edges, right-of-ways, under dense canopies, and high in canopies.  This invasive vine colonizes by prolific vine growth and seeds that are spread by birds"


Picture
Like all vines, I recommend harvesting honeysuckle vine in the fall and winter months.  That way they are less likely to snap when pulling them.  You can always remember when pulling vines "Sappy Snappy".  That basically means that when the sap is high, in the spring and summer months, vines are more likely to break when being harvested.  Also, winter is a lot easier to harvest vines because there are very few bugs, no critters are out and all the leaves are gone.  

Once you get your vines, you can store them in a cool, dry place until you're ready to use them.  Just like the image here from one of my recent basket weaving classes, I recommend that you coil the vines into loose coils.  However, be sure that they are small enough to fit in whatever pot you're going to use to boil them when you're ready to weave.  Which brings me to the next step.


Picture
Whenever you're using honeysuckle vine, you'll want to boil it for 3 reasons, pliability, bugs and bark.  Obviously, boiling makes the vines much more pliable and easy to use when weaving.  Also, any bugs that are on the vines or in them for that matter will be nixed when you boil the vines.  Lastly, boiling the vines will loosen up the bark so you can remove it from the vines. You'll want to boil honeysuckle vines for about 20-30 minutes or so - until they are rubbery flexible.  (NOTE: Honeysuckle has a real papery outer bark that comes off pretty easily. It also has another layer of bark that's usually pretty tightly attached to the vine.  Get that completely off too. It can be a pain, but once you get a clean vine, it will turn a beautiful ivory white.)  With small vines, you can literally put on some 'gripper gloves' (you know the garden gloves with gripper on the palms and fingers), pinch the vine and pull the bark right off.  With larger vines, I recommend you go all the way down the vine twisting the wet bark on the vine.  Then once it's totally loosened up peel it off.  If you're a papermaker, this bark is fabulous for natural fiber paper making.  You can also use the long strands of honeysuckle bark for twining or making cordage.

Now that you have your honeysuckle all boiled and cleaned you'll probably be ready for a nap!  Welcome to weaving with natural materials :)  However, now the fun begins.  I usually separate my prepared materials by size.  Large, gnarly pieces are great for handles, long straight pieces for weaving and then medium crooked pieces for weaving or as an architectural element on other baskets.  Whatever it is, you'll want to weave while the vines are wet and pliable.  


Add Comment
 

How to Weave a Basket with Wisteria

09/24/2014

0 Comments

 
Picture
Wisteria is a great ornamental plant that can be trained and used for basketry.  It’s runners have been known to run 50 feet or more when given an unobstructed area like a yard or wooded area nest to where it’s planted.  Many people grow wisteria as a trellis plant and let the runners get very long each year and then harvest them at the end of the season (like honeysuckle, bougainvillea, confederate jasmine and other ornamental vines._

Harvest in the winter time as with other vines because the sap is down, although summertime harvesting for wisteria is not out of the questions, since most of the time it’s long, straight runners don’t have any leaves.  For example, the place I get most of my wisteria for the year is a man’s house who lives close to me - his wisteria runners run under his deck and have none - ZERO - leaves in the summer.  The runners grow about 20-40 feet in length and there are hundreds.


Picture
OK, so when you get them home, I’d recommend coiling and drying the vines. You can, however weave wisteria green because it’s such a woody vine, yet very flexible, there’s almost no shrinkage.  If you want to boil it know that the bark will come off usually.  HOWEVER, the bark, especially on the runners that are pencil to finger thickness is excellent for cordage and fine twining - kind of like honeysuckle bark but MUCH better.  It’s actually akin more to kudzu bark, in that it stays together in one long strand much easier than does honeysuckle.


Picture

You can twine with wisteria very nicely or you can use it in random weaving which is what I use it for alot.   The larger wisteria you can split like kudzu, by taking a knife to the end and making a vertical incision down the center of the vine. Pull evenly and hold the vine between your knees as you split.  If it starts getting off center, simply pull to the fatter side as you split until it evens back up OR just re-clip it again with your sharp garden clippers or knife.  Wisteria without the bark dries a very nice ivory white and very smooth.  With the bark, it’s a beige color.  

Of you’re planning to plant Wisteria around your house or condo, just make sure you’re ready to keep an eye on it during the growing months and train it where you want it to go.  Otherwise you will have a beast on your hands - and PLENTY of weaving material.


Add Comment
 

Understanding basic basket WEAVING techniques

09/24/2014

0 Comments

 
Picture
Picture
If you are just starting out in the very satisfying and peaceful craft of basket making, you may not be familiar yet with some of the weaving terms that you read in books. This article is designed to assist you learn some of the basic weaving terms quickly and the utility of each technique.

1 Start by understanding some basic terms:

·         Weaver - these are the basket strands that weave through the spokes; they are lighter, thinner and more flexible than the spokes, to enable them to be woven in and out;

·         Spoke - these are the strands that stand upright and form the side supports of the basket; they are much stiffer than the weavers and are strong.


2 Be familiar with under-and-over-weaving. 
This is the most commonly used technique. It is also the simplest. The illustration indicates its form.


Picture
3 Note that double weaving is the same form but two weavers are used at once. 

This is an effective weave on large surfaces, and in bands or patterns of the same or a contrasting color on plain rattan baskets.


Picture
4 Note that pairing may be used with an odd or even number of spokes.

Two weavers are started behind two succeeding spokes, and crossed between them, so that what was the under weaver becomes the upper weaver each time.


Picture

5 Identify the triple twist.


 Here, three weavers are placed behind three consecutive spokes, starting with the back one, over two and under one spoke, each on its way to the back of the third spoke being laid over the other two weavers. In turning up the sides of large baskets where separate spokes or additional spokes have been inserted, or as a strong top for scrap baskets, this weave is invaluable.
Add Comment
 

    Archives

    September 2014

    Categories

    All
    Basic Weaving
    Basket Making
    Double Weaving
    Pairing
    Spoke
    Triple Twist
    Under-and-over-weaving
    Weaver
    WEAVING TECHNIQUES

    RSS Feed


Powered by Create your own unique website with customizable templates.